Introduction
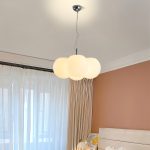
Paper mache is an age-old craft dating back to ancient China. It involves using paper pulp or shredded paper mixed with a glue-like substance to create a sturdy material that can be molded into various shapes. One of the most popular uses for paper mache is in the creation of lamps. Paper mache lamps offer a unique and beautiful lighting solution, providing soft and warm illumination while also adding a decorative element to any room. In this article, we will explore the art of paper mache lamps, discussing their history, the materials and tools required to create them, and the step-by-step process of making your own paper mache lamp.
The History of Paper Mache Lamps
The art of paper mache dates back to the Tang dynasty in China, where it was primarily used for creating items for religious ceremonies. Later, it spread to Japan and Europe, where it was used to create decorative objects and masks. In the 19th century, paper mache became a popular medium for creating lamps, with manufacturers creating intricately designed paper mache shades that could be fitted onto standard lamp bases. Today, paper mache lamps remain a popular option for those looking to add a unique touch to their homes.
Materials and Tools for Making Paper Mache Lamps
To make a paper mache lamp, you will need the following materials:
- Newspaper
- Water
- White glue
- A balloon
- An LED light bulb or a string of LED lights
- Fabric or ribbon for decoration (optional)
The tools you will need include:
- A bowl
- A stirrer
- A paintbrush
- A needle or a pin
- A pair of scissors
Step-by-Step Instructions for Making a Paper Mache Lamp
Now that you have gathered all the materials and tools you need, it’s time to start creating your paper mache lamp. Follow these steps:
Step 1: Inflate the Balloon
Begin by inflating the balloon to the desired size. This will determine the size and shape of your lampshade.
Step 2: Mix the Glue
In a bowl, mix equal parts water and white glue. Stir well to combine.
Step 3: Tear the Newspaper into Strips
Tear the newspaper into strips of varying lengths and widths, being careful not to make them too small or too big. You will need a lot of strips, so tear up several sheets of newspaper.
Step 4: Apply the Paper Mache to the Balloon
Using a paintbrush, apply a layer of the glue mixture to a strip of newspaper, then place it onto the balloon. Continue to add strips of paper, overlapping them slightly, until the entire balloon is covered. Leave a small opening at the bottom so that you can insert the light.
Step 5: Let the Paper Mache Dry
Allow the paper mache to dry completely. This can take several hours or overnight.
Step 6: Pop the Balloon and Remove It
Using a needle or a pin, gently pop the balloon. Carefully remove it from the inside of the paper mache shell.
Step 7: Add the Light
Insert the LED light bulb or string of LED lights into the opening at the bottom of the paper mache shell.
Step 8: Decorate (Optional)
If you wish, you can add ribbon or fabric to the outside of the paper mache shell to decorate it.
Conclusion
Paper mache lamps are a beautiful and unique way to add a touch of warmth and beauty to any room. With a few basic materials and tools, you can create your own paper mache lamp that will provide soft and soothing illumination, while also adding a decorative element to your home. So why not give paper mache lamps a try and see what creative designs you can come up with?